반응형

Fluentd 예제입니다.


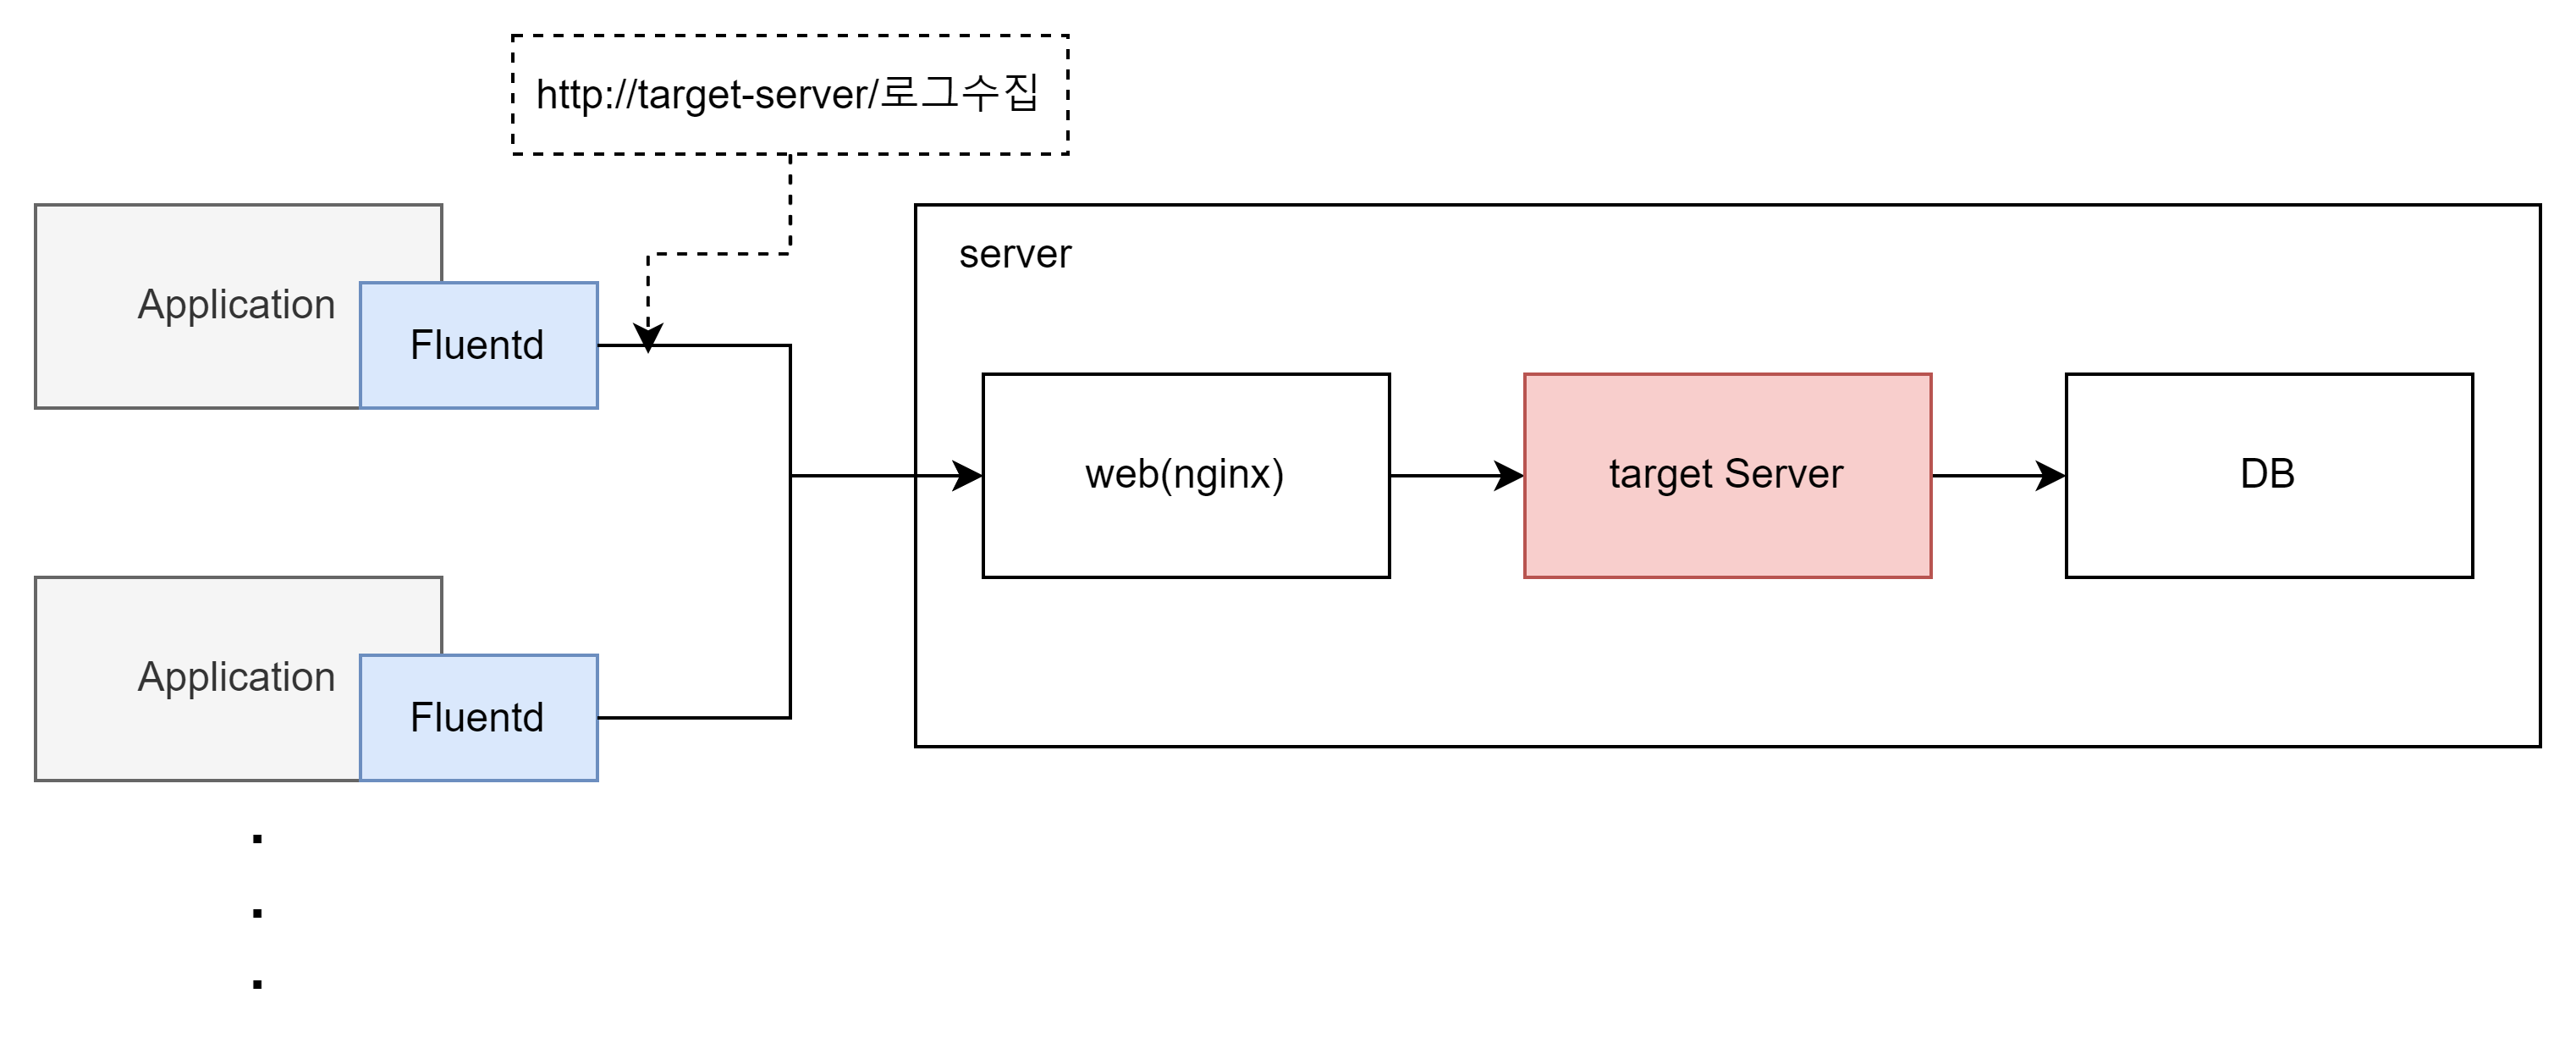
대상서버에 td-agent(Fluentd)를 실행시켜 수집된 데이터를 대상서버 POST API로 저장하는 예제입니다.


예제 프로세스


Fluentd의 conf의 구성은 아래와 같습니다.

Fluentd Configuration


코드 ex)


<source>
  # 다양한 Input Plugins 중에서 tail을 사용했습니다.
  @type tail
  # 실제 물리적 파일 위치
  # 파일 타입에 따라 *를 쓰거나 %Y%m%d(20211224)로 해당 폴더에서 특정 패턴의 파일을 지정할 수 있다.
  path /test/test_%Y%m%d*.log
  # tag를 이용하여 동일한 conf파일에서 각각의 filter와 match를 구성할 수 있다.
  tag logFile.*
  # 현재 추적하고 있는 파일의 index를 저장하고 있는 파일
  pos_file /var/log/td-agent/logFile.log.pos
  # Parse Plugin 중 정규식 패턴을 이용 @type regexp
  <parse>
    @type regexp
    # 해당 표현의 정합성을 테스트하기 위해서 https://rubular.com/ 를 이용하시면 됩니다.
    # ?<year> 는 year가 키값이 되고 정규식 패턴에 맞는 내용이 value가 됨
    # test string
    # 2021-11-13|error|NullpointError
    expression /^(?<year>[^-]*)-(?<month>[^-]*)-(?<day>[^|]*)[|](?<loglevel>[^|]*)[|](?<data>.*)$/
    time_format %d/%b/%Y:%H:%M:%S %z
  </parse>
</source>

# 대상 source는 여러개가 되어도 된다.
# 동일한 fliter를 탄다면 tag명도 동일하게 셋팅 가능하다.
#<source>
  # 두번째 파일 또는 다른 타입의 input plugin 셋팅 가능
#</source>

# 첫번째 filter 
<filter logFile.**>
  # grep plugin을 사용
  @type grep

  <regexp>
  	# loglevel에서 error와 warn만 보내도록 filter를 걸겠다.
    key loglevel
    pattern /(error|warn)/
  </regexp>

  <exclude>
  	# loglevel에서 pattern not matched는 제외시키겠다
    key loglevel
    pattern /(pattern not matched)/
  </exclude>

</filter>

<filter logFile.**>
  @type grep

  <regexp>
  	# 두번째 fliter data의 데이터중에서 Null인 데이터를 filter 걸겠다.
    key data
    pattern /(Null)/
  </regexp>

  <exclude>
  	# data pattern not matched는 제외시키겠다
    key data
    pattern /(pattern not matched)/
  </exclude>

</filter>

<filter logFile.**>
  # record_transformer 를 이용하여 year, month, day , loglevel, data에서 새로운 Key값을 추가하는 filter
  # 아래 예제는 tail하고 있는 파일 명을 보내고 있다. 
  @type record_transformer
  <record>
    worker_name fluentd_multi
    tag ${tag}
  </record>
  <record>
    hostname ${hostname}
    file ${tag_suffix[-1]}
  </record>
</filter>

#<match logFile.**>
  # http://docs.fluentd.org/articles/out_stdout
#  @type stdout
#</match>

<match logtail.**>
  @type http

  endpoint https://대상api호출 url
  open_timeout 2

  <format>
    @type json 
  </format>
  <buffer>
    flush_interval 10s
  </buffer>
   json_array true
</match>


반응형

'LOG > Fluentd' 카테고리의 다른 글

Fluentd(td-agent) linux(ubuntu)설치 가이드  (0) 2021.12.24
Fluentd(td-agent) Windows 설치 가이드  (0) 2021.12.24
Fluentd 시작하기  (0) 2021.12.24
반응형

1.대상서버


2.OS환경

    Ubuntu 20.04.3 LTS (Ubuntu Focal)


3.Fluentd 셋팅 가이드


  3-1. Install url

    https://docs.fluentd.org/installation/install-by-deb – 설치가이드

    curl -fsSL https://toolbelt.treasuredata.com/sh/install-ubuntu-focal-td-agent4.sh | sh


  3-2. Version

    td-agent v4 (Ubuntu Focal는 td-agent 4버전만 지원)


  3-3. Run td-agent as Ubuntu

    서비스 재시작은 아래 두가지 타입으로 가능합니다.


    sudo systemctl start td-agent.service

    sudo systemctl status td-agent.service

    sudo systemctl stoptd-agent.service


    sudo service td-agent stop

    sudo service td-agent status 

    sudo service td-agent start


  3-4 conf 위치

    /etc/td-agent/td-agent.conf


4. 설치 후 정상동작 확인

  curl -X POST -d 'json={"json":"message"}' http://localhost:8888/debug.test

반응형

'LOG > Fluentd' 카테고리의 다른 글

Fluentd 예제(log파일을 읽어들여 POST API로 전송)  (0) 2021.12.24
Fluentd(td-agent) Windows 설치 가이드  (0) 2021.12.24
Fluentd 시작하기  (0) 2021.12.24
반응형

안녕하세요


1.대상서버


2.OS환경

    Window Server


3.Fluentd 셋팅 가이드

  3-1. Install url

    https://docs.fluentd.org/installation/install-by-msi – 설치가이드

    https://td-agent-package-browser.herokuapp.com/3/windows – 다운로드

    td-agent-3.8.1-0-x64.msi 26.05M


  3-2. Version

    td-agent v3


  3-3. Run td-agent as Windows service

    fluentd --reg-winsvc i --reg-winsvc-auto-start --reg-winsvc-delay-start

    fluentd --reg-winsvc-fluentdopt '-c C:/opt/td-agent/etc/td-agent/td-agent.conf -o C:/opt/td-agent/td-agent.log'

    -o C:/opt/td-agent/td-agent.log 옵션은 Fluentd 로그 생성을 하는 주체


  3-4.conf 파일 위치

    C:\opt\td-agent\etc\td-agent\td-agent.conf

    conf파일 수정 후 service에서 Fluentd 서비스를 리스타트


4. 설치 후 정상동작 확인

  4-1. window키 누르시면 설치된 td-agent cmd를 실행


   4-2. fluentd -c etc\td-agent\td-agent.conf

   4-3. echo {"message":"hello"} | fluent-cat test.event

   4-4. 결과 test.event: {"k", "v"}

반응형
반응형

보통 ELK와 EFK를 많이 들어보셨을 겁니다.


ELK란

Elasticsearch, Logstash 및 Kibana, 이 오픈 소스 프로젝트 세 개의 머리글자입니다.

1. Elasticsearch는 검색 및 분석 엔진입니다.

2. Logstash는 여러 소스에서 동시에 데이터를 수집하여 변환한 후 Elasticsearch 같은 “stash”로 전송하는 서버 사이드 데이터 처리 파이프라인입니다.

3. Kibana는 사용자가 Elasticsearch에서 차트와 그래프를 이용해 데이터를 시각화할 수 있게 해줍니다

  -https://www.elastic.co/kr/what-is/elk-stack-


ELK Stack: Elasticsearch, Logstash, Kibana

ELK Stack이란 무엇인가요? ELK Stack은 널리 알려진 세 개의 오픈 소스 프로젝트인 E=Elasticsearch(Lucene 기반), L=Logstash, K=Kibana의 머리글자를 합친 것입니다. Beats가 추가되어 이제 ELK Stack을 Elastic Stack이

www.elastic.co

EFK란 로그수집을 하는 Logstash의 기능을 Fluentd로 대체하는 것에서 명명되었습니다.


간단하게 말하면 Logstash나 Fluentd의 기능은 로그를 수집하는 것입니다.


Fluentd Documentation

https://docs.fluentd.org/


Introduction - Fluentd

Service Discovery Plugins

docs.fluentd.org


제 블로그에는 수집하고자하는 대상서버에 Fluentd(td-agent)를 설치하여 Log 파일을 읽어들여 수집을 담당하는 서버로 데이터를 전송하여 데이터베이스에 적재하는 로직의 예제를 설명드리겠습니다.

반응형

+ Recent posts